|
> 3000 Ave Marias -- Songs of Sharon -- Remi Ghesquiere -- St-Basil's Hymnal -- PROJIMO -- Beyond Good and Evil |
|
|
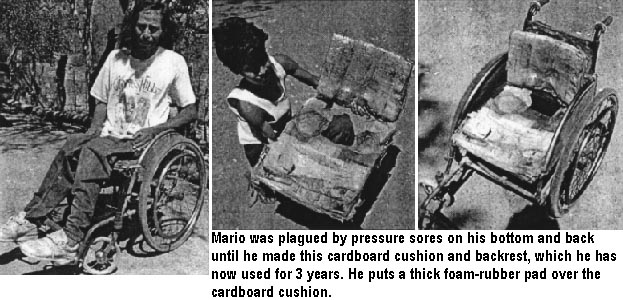
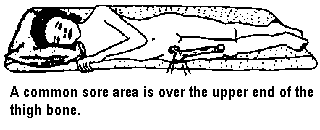
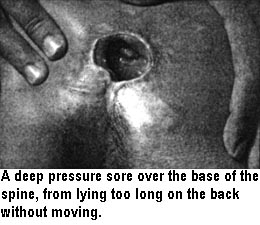
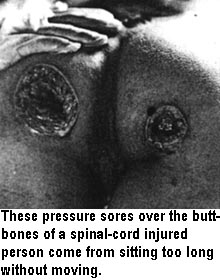
In Project PROJIMO, nearly 400 spinal-cord injured persons have arrived in the last 10 years. Of these, only about 3% have not had pressure sores. Usually, the sores began in the hospital where the person received initial care or surgery for their injury. By the time the person reaches PROJIMO, often their sores are large and deep, and sometimes they are infected. In PROJIMO, spinal cord injured persons have learned to care for one another, to treat each other's pressure sores, and together to look for better ways to prevent them. 156
|
|
Treatment of Pressure Sores
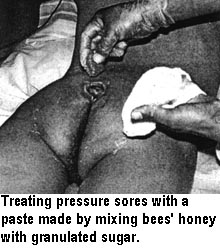
BEES' HONEY. PROJIMO has experimented with different ways to treat pressure sores. Excellent results are often achieved by using a treatment that dates back to ancient Egypt: bees' honey. First, wash the sore carefully with clean water. Then press a paste of honey, mixed with granulated sugar, into the sore. Do this daily, or twice a day if the sore oozes a lot. This treatment works thanks to the fluid-sucking action (osmosis) of concentrated sugar, which both kills germs (by drying them out) and speeds healing (by reducing swelling). Even very large, deep sores that specialists say require surgery have
responded well to this honey and sugar treatment. (See the results with
Osvaldo on page 252.)
PAPAYA. When the sore has a lot of dead flesh in it, it can be packed 3 times a day with a clean cloth soaked in the "milk" from the trunk, or green fruit of papaya. This helps loosen and dissolve the dead flesh. (Cooks use papaya as a meat tenderizer.) Prevention of Pressure Sores While Sitting
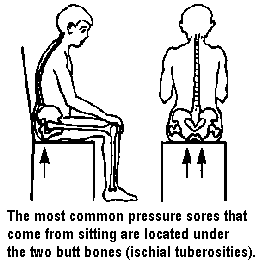
Pressure sores from sitting can mostly be prevented in 2 ways:
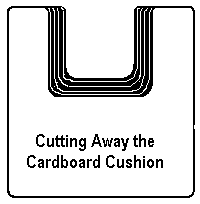
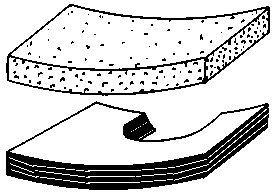
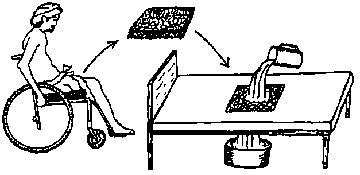
CUSHIONSA good cushion can make a big difference in the prevention of pressure sores. Very costly cushions, either gel-filled or with bubbles of air, are commercially available in some countries. However, very effective cushions can be made at home at low cost. At the Center for Rehabilitation of the Paralyzed in Bangladesh, many persons simply use an inner tube from a motor-scooter tire (see page 194). The hole in the center is big enough to take the pressure off the butt bones. This same Center makes an excellent cushion by coating a
coconut-fiber mat with rubber. To prevent bed sores when lying down, the
person removes the fiber cushion from his wheelchair, and puts it into a
square hole in the middle of the bed mattress. Both waterproof and porous, the mat can be cleaned simply by pouring a bucket of water through it. 157
|
|
| |||||||||||||||||||||||||||||||
To make the cushion:
|
|
|
|
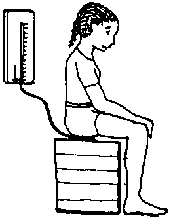
ELECTRONIC PRESSURE TESTERS. Even with a good cushion, pressure sores are sometimes hard to avoid. It would be helpful to be able to check whether a cushion (or bed padding, or mattress, etc.) keeps the pressure low enough under the danger spots (bony areas) to avoid sores. In the USA, a few hospitals now have "high-tech" electronic equipment for measuring pressure against the skin. The person sits on a pad that is wired with many small pressure-sensitive cells. The pressure in different spots is read on a monitor, similar to a television screen. But these pressure-measuring devices cost thousands of dollars. They are so expensive that almost none exist in the Third World.
NEED FOR A LOW-COST TESTER. The need for an "appropriate technology" pressure testing instrument was discussed by a small group at the annual conference of RESNA (Rehabilitation Engineering Society of North America) held in Toronto, Canada, in 1991. Ralf Hotchkiss, Mari Picos, and David Werner - all involved with the innovative research project at PROJIMO - brain-stormed with special-seating specialist, Michael Heinrich. Michael thought that a low-cost pressure tester might be made by using small balloons and columns of water. He decided to visit PROJIMO to work with the team to improvise such an instrument.
The tinkering process (or logical steps) that led to the innovation were as follows:

In older cuffs, pressure is measured by observing how high it lifts a column of mercury (quicksilver) in a glass tube.
Hence, blood pressure is measured in millimeters (mm) of
mercury.
![]() IDEA!
Why can't we use the same instrument, or one based on the same science,
to measure pressure on the skin? The person can sit on top of
the pressure cuff. Depending on the amount of pressure that pushes on
the cuff, the mercury will rise to a measurable height in the glass
tube.
IDEA!
Why can't we use the same instrument, or one based on the same science,
to measure pressure on the skin? The person can sit on top of
the pressure cuff. Depending on the amount of pressure that pushes on
the cuff, the mercury will rise to a measurable height in the glass
tube.
![]()
* IDEA! Instead of a pressure cuff, why not use a small
elastic bag - maybe a balloon?
* IDEA! Instead of mercury, why not colored water?
But using water will require a very tall measuring instrument. This is because mercury is 13.5 times heavier than water. The same pressure that will lift mercury in a tube 12 centimeters (normal blood pressure during a pulse) will lift water 162 centimeters (cm), or over one and a half meters!
But, why not? Plastic tubes can be used instead of glass. When not in use, the whole thing can be rolled up and put in a pocket.
So we thought, "Let's try it!"
Solution:
In one week, Michael Heinrich and the PROJIMO team designed, made, and tested the first model of a simple, low-cost instrument to measure pressure on the skin.
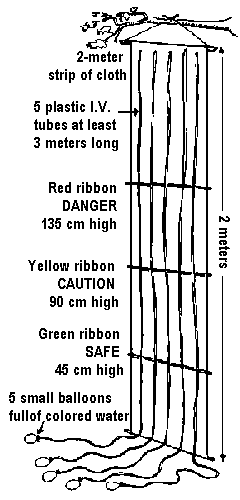 The
instrument is made with 5 small balloons filled with
colored water. Each balloon is tightly tied to the end
of a thin plastic tube about 2 meters long. The tubes
are mounted on a long strip of cloth. This is hung from
a tree branch or a beam, so that the bottom of the cloth is at the
height of the seat of the wheelchair (or the mattress of a bed, etc.).
The
instrument is made with 5 small balloons filled with
colored water. Each balloon is tightly tied to the end
of a thin plastic tube about 2 meters long. The tubes
are mounted on a long strip of cloth. This is hung from
a tree branch or a beam, so that the bottom of the cloth is at the
height of the seat of the wheelchair (or the mattress of a bed, etc.).
Three horizontal ribbons are sewn across the cloth: a green ribbon at 45 cm from the bottom of the cloth, a yellow ribbon at 90 cm, and a red ribbon at 135 cm These ribbons mark the 3 pressure zones in terms of danger for pressure sores: green = safe; yellow = caution; red = danger.
To better see the water level in the plastic tubes, food coloring was added to the water. A local natural food coloring, saffron, was found to work well.
The team experimented with plastic tubes of several sizes. Very thin tubing (about 2 mm inner-diameter) worked best. With it, quite small balloons could be used, which gave more exact pressure readings over small areas. Used "I.V." (intravenous fluid) tubes worked well. They were available in the village health center.
Several sizes of small balloons (bought in the village store) were tried. Balloons about 2 x 5 cm when filled were picked. They held just enough water so that when squeezed flat, the water would rise near to the top of the long plastic tubes.
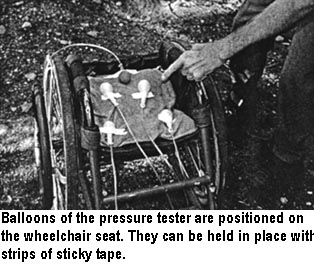
The new skin-pressure tester was tried out with disabled children and adults with various disabilities, using different seats and cushions.
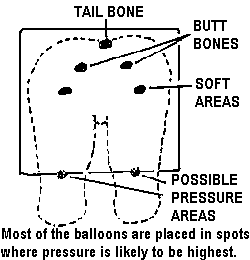
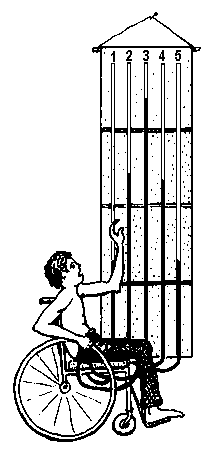
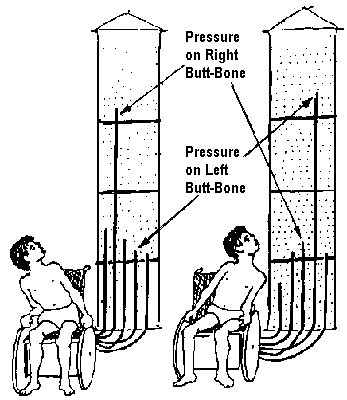
To use the pressure tester, the 5 balloons (or fewer) are carefully positioned on the seat or cushion under the person's backside. Typically, 2 balloons are placed directly under the butt-bones (ischial tuberosities): one just above the tail-bone (or base of the spine), and the other two under softer, fleshier areas (for comparison).
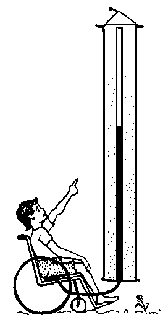
POSITION OF BALLOONS
|
|
|
|
Position of balloons + tubes: 1: under R thigh / 2: under R butt-bone / 3: under tail-bone / 4: under L butt-bone / 5: under L thigh |
|
Results:
The measuring instrument clearly showed differences in the amount of pressure (from low to high) on non-bony and bony areas - with or without a cushion:
|
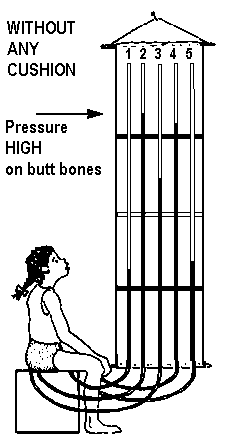
When a person sat on a flat, hard surface, the pressure on the balloons under the butt-bones lifted the water above the red ribbon into the danger zone, while the pressure under fleshy areas of the butt stayed low. |
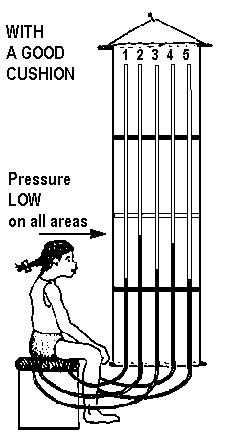
In contrast, when using a special cushion (whether air, gel, or molded cardboard) pressure on the butt-bones often measured in the yellow or even green zone. However, this varied from person to person and sometimes from one buttock to the other. |
The pressure tester can be used in a variety of ways. These range from teaching the disabled person how to relieve pressure, to testing and trouble-shooting cushions.
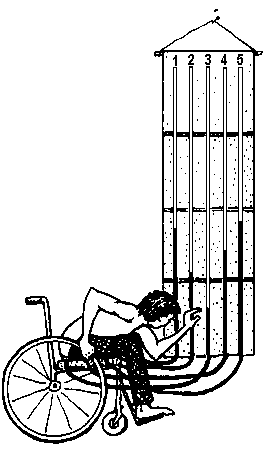
1. Teaching wheelchair riders the importance of frequent weight shifting.
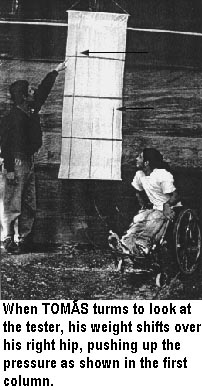
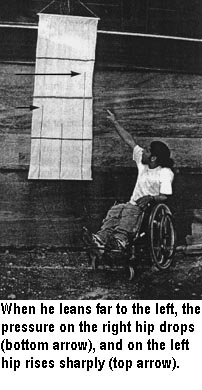
The pressure-tester can be used as a way of helping the person learn more about the responses of the body - a process called bio-feedback.
When persons being "pressure tested" bend their upper body from side to side, they can see in the plastic tubes how the pressure shoots up into the red (danger) zone under one butt bone, and drops into the green (safe) zone under the other butt-bone.
| Position of balloons + tubes:
1: under R thigh / 2: under R butt-bone / 3: under tail-bone / 4: under L butt-bone / 5: under L thigh |
|
| For example, spinal-cord-injured persons who tend to slump
back in their wheelchairs can see how this can cause high pressure
over the tail-bone (or sacrum).
|
They can observe how leaning forward lowers the pressure over
the tail-bone area, and also over the 2 butt-bones.
|
2. Spotting high-pressure spots in persons who sit in a lopsided position.
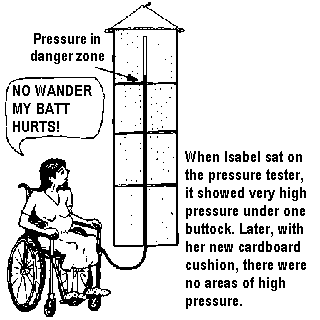
Example: ISABEL, a leader in Brazil's Independent Living movement, has all four limbs weakened by polio. She has a lot of spinal curve and sits in a lopsided position. She complained of discomfort when sitting in her wheelchair, and thought a better cushion might help.
During a recent training program in community based rehabilitation (see Chapter 50), students practiced making simple technical aids. One group made a simplified pressure tester, with only one balloon and tube. On testing Isabel, they found she had very high pressure under one buttook, and lower pressure under the other.
A second group made her a special cushion to better equalize the pressure under her butt bones. First they experimented with different thicknesses of padding below each buttock. Then they made a personalized cardboard cushion, as described on page 157. They retested the pressure and modified the cushion until the pressure under both buttocks was low and nearly equal. With her new cushion Isabel sat straighter with less discomfort.
VICTORIO is a paraplegic wheelchair builder at PROJIMO who took interest in making and testing the "pressure tester." Victorio uses a molded cardboard wheelchair cushion that he made himself. For several months it served him well, but then he began to develop a small pressure sore under one of his butt bones (ischial tuberosities). Although he was careful to lift himself in his wheelchair often, and worked to heal the sore, it had shown little sign of healing for more than two months.
On reading the pressure measurements with the balloons in different positions under his backside, Victorio discovered the cause of his sore. Directly below the butt-bones the pressure was normal. But under the front edge of these bones the pressure was in the red zone (dangerously high).
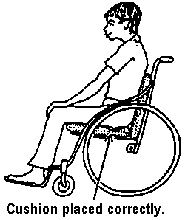
Now he understood the reason for his problem! Two months before, after enjoying the good results of his cardboard cushion, he had decided also to make a cardboard back support. The new back support - about 3 cm thick - shifted his body forward in the wheelchair. This caused his butt-bones to press against the front border of the hollows in the cardboard seat cushion (which he had carved to prevent pressure under the butt-bones).
In short, with his new back rest, Victorio was sitting too far forward. On discovering this, he moved his seat cushion 3 cm forward and retested the pressure. Now it was well below the danger zone. Three weeks later, Victorio's sore was healed.
Several problems arose during the initial trials with the pressure measuring instrument, and attempts were made to solve them:
1. Difficulty in filling the balloons with the colored water.

It proved difficult to fill the balloons through the long thin plastic tubes. Using a large syringe to inject the water down the tubes made it easier. To make it still easier, small plastic T-connectors were inserted in each tube a few cm from the balloons. For filling, short side-tubes were attached to these connectors. Plugs were put into these side-tubes to prevent the water from running out when the tester was in use.*
The narrow diameter of the plastic IV tubing causes a drainage problem. When the water level in the tubes drops, some water tends to cling in the tubing, causing patches of water separated by air pockets. Tapping the tubes often helps.
It was found that this problem could in large part be overcome by adding a little detergent (a kind of soap) to the colored water. This makes the column of water hold together and helps prevent water droplets from sticking to the walls of the plastic tubes.
3. Five balloons may be too many.
 On
evaluating the tester, most people felt that 5 balloons and tubes were
more than are usually needed. It takes a lot of time and precision to
set up the 5-balloon equipment. Even with the T-connectors, filling the
balloons and getting air bubbles out of the tubes can be troublesome.
Also, trying to position all 5 balloons correctly under someone's
backside at the same time is not easy. Persons doing the test
often prefer to use 3 balloons or fewer.
On
evaluating the tester, most people felt that 5 balloons and tubes were
more than are usually needed. It takes a lot of time and precision to
set up the 5-balloon equipment. Even with the T-connectors, filling the
balloons and getting air bubbles out of the tubes can be troublesome.
Also, trying to position all 5 balloons correctly under someone's
backside at the same time is not easy. Persons doing the test
often prefer to use 3 balloons or fewer.
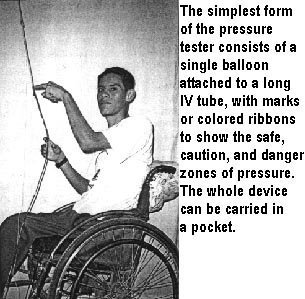
PROJIMO and Michael Heinrich (who made a return visit a year later) have been experimenting with simpler models using 3 balloons and tubes, or even only one or two balloons. The one-balloon model can be successfully used to trouble-shoot high-pressure areas. The balloon can be positioned under one trouble spot and then another. On the single tube, 3 colored strings or threads can be tied to mark the safe, caution, and danger zones.
As a teaching tool, using one balloon only is not as effective as using more balloons, to show how pressure over different areas rises and falls differently with shifts of position. For a simplified model, the 2-balloon equipment may be the best compromise.
Fortunately, the skin-pressure tester was developed, tested, and improved during one of the many "appropriate technology in rehabilitation" courses that PROJIMO has conducted during the past two years. This meant that participants from several different programs in Mexico and Central America were able to take part in all phases of the development and experimentation of this new device. Two of the visitors made their own pressure testers to take back to their respective programs, and others took home drawings, photographs, and designs. (We have yet to get feedback on how this equipment is being used in the different programs.)
PROJIMO has continued to use the pressure tester, both as a trouble-shooting and teaching tool, with good results and often with enthusiastic response from users.
We feel that this low-cost, easy-to-make instrument for measuring pressure against the skin may prove to be a real breakthrough in helping to reduce the vast amount of suffering and death (and the devastating costs) caused by pressure sores in the Third World. This is one of the most important innovations developed at PROJIMO.
| ||||||||||||||||||||||||||||||
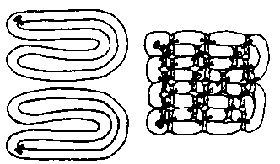 Cushions
made from bicycle inner tubes.
Cushions
made from bicycle inner tubes. 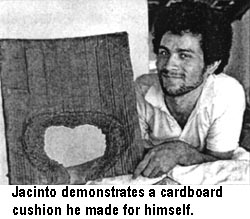 Cardboard
cushions.
Cardboard
cushions.